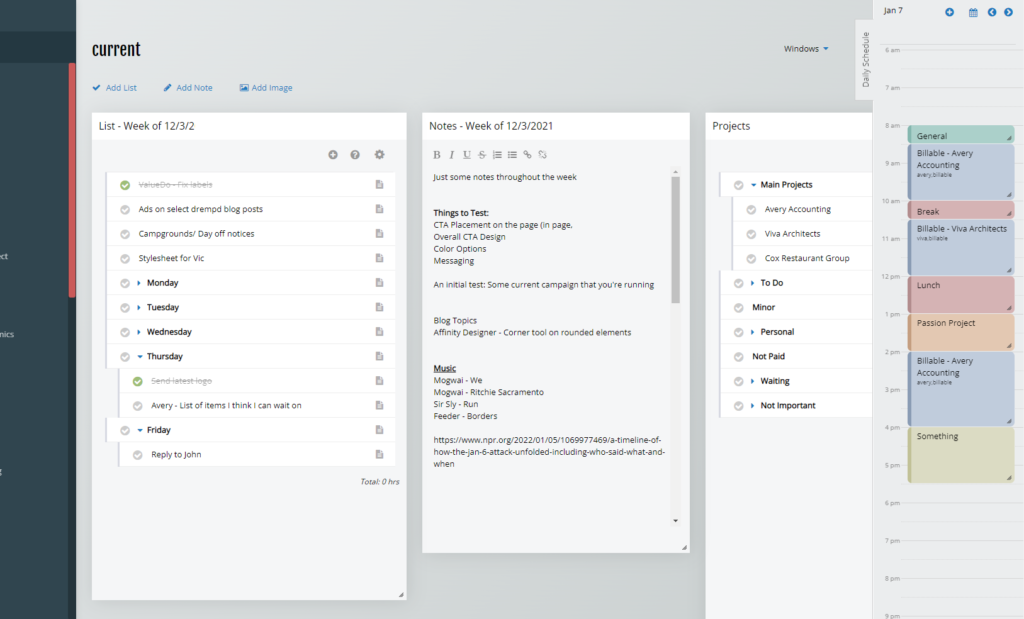
To Do List With Schedule
Note (7/8/2024): This post was about my note/list/scheduling web application. It no longer exists online, but I am working on a similar project as a desktop/mobile app, which should be ready sometime in 2025. You can follow the latest work on this project here.
I’ve always felt that a to do list by itself only provides half of the overall picture. I create many lists, but without a plan for actually accomplishing those tasks, it’s kind of meaningless. The goal for Vimsio has always been to provide a to do list along with a schedule, so I can not only record everything I need to accomplish, but so I can also develop a plan to actually get it done.
While todo lists have been a part of Vimsio for quite some time, daily schedule functionality is a relatively new feature, and you can expect quite a few improvements and updates in the near future. To start using the daily schedule functionality, just make sure it is open and visible by clicking on the “Daily Schedule” tab along the right edge of the screen. The schedule will default to the current day, but you can navigate to different days using the arrow icons, or the calendar icon at the top of the schedule.

Using the Daily Schedule
The schedule pane will always be visible (as long as you have opened the tab) as you navigate from tag to tag. This can be helpful if you have multiple lists in different tag groupings (of course you can always see all of your separate lists in a single view if you also include a common tag — just a bit of a pro tip!). To create a new event, such as a block of working time, a meeting, or any other block of time that you would like to denote, just click and drag the mouse to create an event for the duration needed. The schedule functionality snaps to half-hour increments, but you can change the actual times to whatever is need once you start editing the event. Once you release the mouse button after dragging, Vimsio will open a popup so you can add event details:
- Event Times – Vimsio will add in the times based on your click-and-drag, but you can edit the actual times using the “When” text boxes.
- Title – You can provide a title for your event. This will be visible on the schedule.
- Notes – You can add notes to give context to your events. These don’t appear on the schedule pane — to view the notes you’ll need to click on the event to view (or edit) your notes.
- Tags – You can assign tags to events (and multiple tags separated by commas) in the ‘tags” text box. Once you have added tags to events, you can click on the tags to see a full listing of events that share that tag. This can be very helpful to see how long you’ve spent on a specific project or to generate a listing of billable time for a client.
- Color – You can assign a color to an event by clicking on one of the colored squares in the “color” section. The events tile will now have a background color applied. I often use colors to help me clearly see how I spend my days (I use blue for billable time, green for general work time, maroon for breaks or play time, etc…)
Once you has added in all of the information needed for your event, click the “create event” button to add it. To edit the event again, just click on the event tile. You can also click-and- drag event tiles around the schedule pane to move them to different times.
Planning Your Day
I usually like to plan my days by making sure my to do list is visible, and then dropping some event tiles onto my schedule related to those items. I also like to track other items on my schedule, like breaks and workouts. My schedule usually changes as my day progresses, which isn’t an issue, I just update my schedule as I go.
The ability to see both my to do list and my schedule in one view is an incredibly helpful feature that massively helps me to stay focused during the day and improves my overall productivity. It’s also nice to see my day come together, as my schedule solidifies as the day progresses, which also helps to give a nice feeling of accomplishment.
